Digital Forensics:REMOTE FORENSICS WITH BELKASOFT
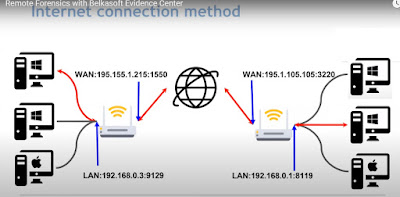
Remote Acquisition of Digital Devices with Belkasoft
- Remote acquisition of hard and removable drives, volatile memory
- Remote acquisition of connected smart devices(iOS, Android)
- Forensic analysis of the acquired image at the central location
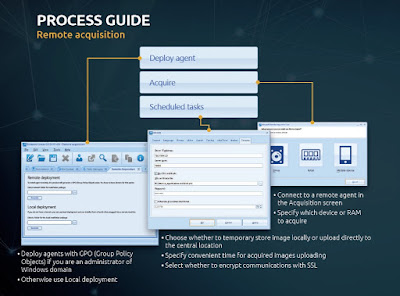
Process Guide Remote acquisition
How-to
- Click on the "View" main menu item.
- Then click on "Remote acquisition". The following screen will be shown:
- If you have not deployed the agent, do it with "Deploy agent" button.
- Once you have clicked "Deploy agent", there will be two kinds of agent deployment with Belkasoft Evidence Center:
- your option is "Local deployment". You need to choose a folder on your computer and click on the second "Generate" button in this case. As a result, a set of files will be generated which should be passed to the computer of interest: via network folders, a thumb drive, etc. After that, the agent executable file should be run on such a machine.
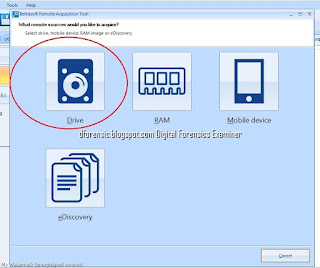
- After you complete the previous stage, you can launch the process of acquisition by clicking on "Acquire" and selecting one of the available agents in the list at the right.
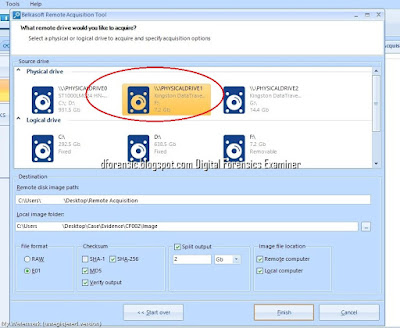
- Let us assume that you would like to acquire a hard drive image. Once you have clicked on the "Drive" button, you will see the following screen with a range of options:
Please remember that hard drives can be acquired unattended,
- "Source drive". Here you can choose a physical drive or a logical one (of course, they mean remote drives connected to the computer of interest).
- "Destination". You can select a location for the acquired image on both a remote computer and your local one.
- "File format", "Checksum" and "Split output" output work the same as for a drive acquisition.
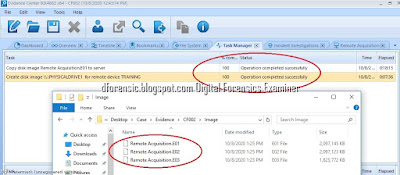
- You can schedule your image uploading. We recommend scheduling it for nighttime especially if you would like to upload several images at once or just one big image. Otherwise your (and your colleagues) connection quality may degrade.
- After the image uploading is finished, you can add images acquired remotely to your local Belkasoft Evidence Center case. You can then analyze their contents the same way you do with locally acquired images.
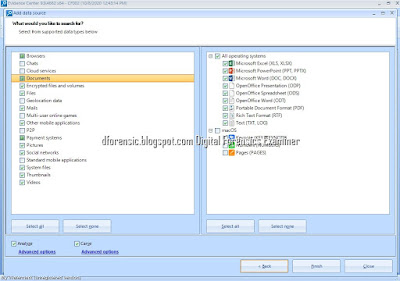
Once we click the Create and open button a new window will open, asking us to add evidences for the case. As you can see, we can add a wide variety of evidece types:
- Disk images, either E01, AFF, DD…
- An installed storage device on the system (such as a cloned hard drive).
- A folder containing evidence files.
On the other hand, we are also presented options about about adquiring and anylizing a storage drive, a mobile device or even make an adquisition of a cloud storage account.
In our case we will add a testing disk image, consisting on a E01 file from a Windows 8 created specially for this.
As you can see, we are able to select the options of performing an analysis of the date to find artifacts (which is both preselected and convenient) and also perform a search for files which hash matches a value stored in an internal database in the program. This is interesting if we are looking for a concrete indicator of compromise or IOC in our investigation.Once we click Finish we will be asked if we wish to add another source of information. For the moment, we will say no and focus on the hard drive analysis.
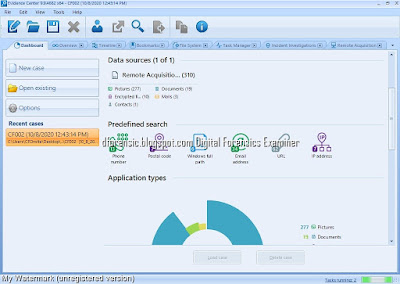
Automatically we will be sent to the Case Explorer tab, and we will soon start to see diverse artifacts appear on the left panel. We can also see the number of tasks being executed currently. Clicking on this indicator will show us the detail about these tasks and their state, with higher detail if we select each of them, inside the Task Manager tab.
- หมายเหตุ:เนื้อหาในเว็บไซต์นี้มีขึ้นเพื่อวัตถุประสงค์ในการให้ข้อมูลและเพื่อการศึกษาเท่านั้น
* หากมีข้อมูลข้อผิดพลาดประการใด ขออภัยมา ณ ที่นี้ด้วย รบกวนแจ้ง Admin เพื่อแก้ไขต่อไป
ขอบคุณครับ
#WINDOWSFORENSIC #COMPUTERFORENSICS #DFIR #FORENSICS #DIGITALFORENSICS #COMPUTERFORENSIC #INVESTIGATION #CYBERCRIME #FRAUD








No comments:
Post a Comment