Showing posts with label WIPE. Show all posts

Friday, September 10, 2021

Digital Forensics:WIPE a drive using DC3DD

Digital Forensics:WIPE a drive using DC3DD

fdisk

Fdisk is the most commonly used command to check the partitions on a disk. The fdisk command can display the partitions and details like file system type. However it does not report the size of each partitions.

#sudo fdisk -l


dc3dd is a patched version of GNU dd with added features for computer forensics:

  • on the fly hashing (md5, sha-1, sha-256, and sha-512)
  • possibility to write errors to a file
  • group errors in the error log
  • pattern wiping
  • progress report
  • possibility to split output

dc3dd  --help

Overwriting and filling the data and drives with zeroes. The command used is dc3dd wipe=/dev/sdb:

Overwriting and filling the data and drives using a hexadecimal pattern using the pat option. The command used is dc3dd wipe=/dev/sdb pat=00

Log=wipelog.txt

 pattern wiping 00

Credit:https://tools.kali.org/forensics/dc3dd

หมายเหตุ:เนื้อหาในเว็บไซต์นี้มีขึ้นเพื่อวัตถุประสงค์ในการให้ข้อมูลและเพื่อการศึกษาเท่านั้น

* หากมีข้อมูลข้อผิดพลาดประการใด ขออภัยมา ณ ที่นี้ด้วย  รบกวนแจ้ง Admin เพื่อแก้ไขต่อไป
ขอบคุณครับ

#WindowsForensic #ComputerForensics #dfir #forensics #digitalforensics #computerforensic #investigation #cybercrime #fraud

Monday, March 15, 2021

DIGITAL FORENSICS:How to Wipe a USB flash drive

DIGITAL FORENSICS:How to Wipe a USB flash drive

WIPE Part IV 

Disk Wiping Software with PALADIN Forensic


 Wipe Tool  step by step

1. Digital Forensics Laptop Workstation 
2. PALADIN EDGE 64 (Version 8.01) USB boot
3. Datatraveler flash drive 16 GB (For Wipe)
4. Autopsy 4.15

PALADIN Toolbox - Preparing Media - Sterilize (Wiping)

PALADIN Toolbox sterilizes media by writing “zeros” to the entire device with a single

pass. Toolbox gives you the option to perform a verification to ensure that the drive only

consists of zeros. Most tools tend to hash the drive with a CRC-64 algorithm which will

return a result of zero if properly wiped. Any algorithm takes time to calculate.


Booting PALADIN  USB on a Computer. > Forensic Mode


To sterilize a drive navigate to the Disk Manager tab, highlight the physical drive that you

want to sterilize and click “Wipe”.

Once you have clicked “Wipe” Toolbox will ask you if you are sure ... ONCE!

write zeros across the entire drive in a single pass. A new Verify after Wipe

PALADIN Toolbox will then ask if you would like to “Verify” the Wipe.

“Device Wiped successfully” message appears after
successful verification. The device is now ready for
formatting if desired.

Log write zeros to hard drive 
 The command used is dc3dd wipe=/dev/sdcdevice


หมายเหตุ: เลือก path  บันทึก wipe log 

Preview
 files and folders on local Physical drives with FTK Imager.

WIPE คืออะไร , มาตรฐาน DoD คืออะไร

สรุป  

     - PALADIN EDGE มีคำสั่งในการ wipe  ข้อมูลได้

     -เมื่อ wipe  hard disk  แล้วมี log เก็บไว้

Freeware Disk Wiping Software

  • Active@Killdisk www.killdisk.com
  • Darik's Nuke and Boot www.dban.org
  • Eraser www.heidi.ie/eraser

Refer:

https://sumuri.com/product/paladin-edge-64-bit/

หมายเหตุ:เนื้อหาในเว็บไซต์นี้มีขึ้นเพื่อวัตถุประสงค์ในการให้ข้อมูลและเพื่อการศึกษาเท่านั้น

* หากมีข้อมูลข้อผิดพลาดประการใด ขออภัยมา ณ ที่นี้ด้วย  รบกวนแจ้ง Admin เพื่อแก้ไขต่อไป
ขอบคุณครับ

#WindowsForensic #ComputerForensics #dfir #forensics #digitalforensics #computerforensic #investigation #cybercrime #fraud

Sunday, September 6, 2020

Digital Forensics:How to Wipe Hard Disk with OSforensics

Digital Forensics:How to Wipe Hard Disk with OSforensics

Overwriting and filling the data and drives with zeroes.

OSforensics can wipe data and erase drives by overwriting data.

 
Step 1 Open OSForensics  3.3 Free Version.

Step 2 Select Drive Preparation  > Physical drive (Removable 14.41 GB K:FAT32)
Datatraveler 100 g3 16 GB

Write a data pattern to the entire drive "00".

Step 3. Click Write pattern.
Until Progress is 100%.

Step 4. Click Verify pattern.

Step 5. check pattern
Open Windows Explorer and navigate to the FTK Imager 3.4.0.1
In FTK’s main window, go to File and click on add Evidence Item.

Step 6.Select Physical Drive as the source evidence type. Click on Next.
Select the actual physical drive from the drop down list and click on Finish.
Open the Physical Drive of my flash drive in FTK Imager. The contents of the Physical Drive appear in the Evidence Tree Pane. "00"


Credit: PassMark OSForensics 

* หากมีข้อมูลข้อผิดพลาดประการใด ขออภัยมา ณ ที่นี้ด้วย  รบกวนแจ้ง Admin เพื่อแก้ไขต่อไป
ขอบคุณครับ


หมายเหตุ:เนื้อหาในเว็บไซต์นี้มีขึ้นเพื่อวัตถุประสงค์ในการให้ข้อมูลและเพื่อการศึกษาเท่านั้น

#wipe #secureerase #diskwiping #Sanitization #Computer Forensics #DigitalForensics#WINDOWSFORENSIC #COMPUTERFORENSICS #DFIR #FORENSICS #DIGITALFORENSICS #COMPUTERFORENSIC #INVESTIGATION #CYBERCRIME #FRAUD

Wednesday, November 29, 2017

Digital Forensics:WIPE Part III

Digital Forensics:WIPE Part 3

    สำหรับตอนที่ 3   นี้ เนื่องจากมีหลายคนสอบถามเรื่อง การ WIPE  ข้อมูลแล้วมีโอกาสกู้ได้หรือไม่ ? แอดมินเลยมาทำการทดสอบให้ดู ด้วยเครื่องมือที่  (ใครๆก็ทำไม่ได้  ถ้าไม่มีเครื่องมือนี้ Tableau Forensic Duplicator TD2 )  อยากรู้จักเครื่องมือนี้ให้ไปอ่าน Wipe Part 2 (https://bit.ly/2QnCiQy)
อ่านเพิ่มเติมที่ https://bit.ly/2AwHesw  เพราะราคา แรงพอสมควร โชคดีแอดมีไว้สำหรับศึกษา...


1. ทำการ Wipe  Harddisk ตัวอย่างที่ใช้ทดสอบคือ harddisk notebook แบบ SATA  Fujisu 2.5  120 GB 

2. ใช้อุปกรณ์  TD2 ทำการ Wipe  harddisk  แบบ One  Pass Write
TD2
3. ใช้ Accessdara FTK Imager 4.2.0.13  ทำการ Add  Harddisk เข้าไปดูข้อมูลข้างใน
4.ผลลัพธ์ที่ได้จะเห็นว่า เมื่อใช้ FTK Imager ดูข้อมูลใน Disk พบว่ามี เลข 0 อยู่เต็มพื้นที่ของ DISK

WIPE ZERO

5. ทำซ้ำอีกครั้ง โดยใช้  Multi pass Write  จะเป็นการ Wipe 3 รอบ

TD2 Multi pass Write 

6. ใช้โปรแรกม FTK Imager  ทำการ Add  Physical Harddisk เข้าไปดูข้อมูลใน harddisk ผลลัพธ์ที่ได้จะเห็นว่า เมื่อใช้ FTK Imager ดูข้อมูลใน Disk พบว่ามี เลข A9 อยู่เต็มพื้นที่ของ DISK


Multi pass Write 

7. เอาแค่นี้ก่อนครับ ไว้มาทดสอบต่อ

#wipe
#secure erase
#disk wiping
#Sanitization

หมายเหตุ:เนื้อหาในเว็บไซต์นี้มีขึ้นเพื่อวัตถุประสงค์ในการให้ข้อมูลและเพื่อการศึกษาเท่านั้น

* หากมีข้อมูลข้อผิดพลาดประการใด ขออภัยมา ณ ที่นี้ด้วย  รบกวนแจ้ง Admin เพื่อแก้ไขต่อไป
ขอบคุณครับ

#ComputerForensics
#DigitalForensics

Saturday, September 23, 2017

Digital Forensics:WIPE Part II

Digital Forensics:WIPE Part 2

 เทคนิคการเตรียม hard disk ไว้สำหรับเตรียมเก็บข้อมูลหรือทำสำเนาข้อมูล  คือการ Wipe  ซึ่งเราจะใช้อุปกรณ์ Tableau Forensic Duplicator (TD2)  ในการทดสอบครั้งนี้  เพื่อให้แน่ใจว่า hard disk ที่จะนำไปใช้สำหรับทำสำเนาข้อมูลไม่มีข้อมูลปนเปื้อนหรือสิ่งอื่นใดหลงเหลืออยู่ Hard disk 
Forensic Duplicator TD2
Standard operations:
  • Disk-to-Disk (clone) duplication
  • Disk-to-File (image) duplication
  • Format
  • Wipe
  • Hash (MD5 or SHA-1)


1. Hard disk ที่จะทำการ Wipe   ให้บันทึกรายละเอียด  Model: WDC WD5000AAKX-00ERMA0
                                              S/N: WD-WMC2E3267484 


2. ทำการเชือมต่อ Hard disk กับอุปกรณ์  Tableau Forensic Duplicator (TD2)

Forensic Duplicator TD2

3. ทำการเลือกคำสั่ง Wipe Disk


TD2 Duplicator

4. รอจนเครื่องทำงานเสร็จ  ทำการ export log file ออกมา เพื่อทำรายงาน

TD2 Duplicator

5. ตัวอย่าง Log file

Task: Wipe
Status: Ok
Created: 2018-08-10 14:39
Closed : 2018-08-10 18:26
User: Dforensic Examiner

Duplicator serial num: 01d21065
Duplicator firmware timestamp: Mar 27 2012 19:49:00
Duplicator firmware revision: 3.15
Duplicator log ID num: 121

--------------------------Wipe Options--------------------------

Wipe method: Multi-pass Write
# of sectors: 976,773,168 (500.1 GB)

--------------------------Dest-1 Disk---------------------------

Model: WDC WD5000AAKX-00ERMA0
S/N: WD-WMC2E3267484
Firmware Revision: 15.01H15
Capacity in sectors reported Pwr-ON: 976,773,168 (500.1 GB)
Capacity in sectors reported by HPA: 976,773,168 (500.1 GB)
Capacity in sectors reported by DCO: 976,773,168 (500.1 GB)
HPA in use: No
DCO in use: No
ATA Security in use: No
Cable/Interface type: SATA
ATA PIO mode: PIO 4
ATA DMA mode: UDMA 6

6. นำ Harddsik ที่ผ่านการ Wipe แล้ว แยกเก็บไว้ในตู้  เพื่อใช้ในเคสต่อไป


 หมายเหตุ ท่านสามารถศึกษาเครื่องมือ Tableau Forensic Duplicator (TD2) เพิ่มเติมได้ที่ website ด้านล่าง

Referent
https://www.guidancesoftware.com/tableau/hardware/td2u

* หากมีข้อมูลข้อผิดพลาดประการใด ขออภัยมา ณ ที่นี้ด้วย  รบกวนแจ้ง Admin เพื่อแก้ไขต่อไป
ขอบคุณครับ


#wipe #secureerase #diskwiping #Sanitization #Computer Forensics #DigitalForensics

Monday, September 18, 2017

Digital Forensics:WIPE DoD

Digital Forensics:WIPE DoD

เคยมีกรณีศึกษาที่บริษัทหลายแห่งนำฮาร์ดดิสก์ออกไปขายต่อหรือบริจาค โดยที่ไม่ได้ทำลายข้อมูลหรือแค่สั่งลบด้วยวิธีธรรมดา   ส่งผลให้ยังสามารถกู้ข้อมูลสำคัญที่เป็นความลับกลับคืนมาได้

"มาตรฐาน DoD" หรือ  DoD 5220.22-M เป็นคำที่มักใช้ในอุตสาหกรรมการล้างข้อมูล
photo credit:blancco[.]com


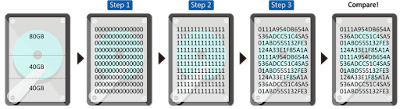
แม้ว่าจะเป็นเทคนิคการเขียนทับที่ จะเขียนข้อมูลเดียวกันทุกที่ มักเป็นเพียงรูปแบบของศูนย์ทั้งหมด หรือ หนึ่งทั้งหมด และ   การเขียนทับแบบสุ่ม   การใช้วิธีการดังกล่าวจะป้องกันไม่ให้ถูกดึงข้อมูล  หรือป้องกันจากซอฟต์แวร์กู้คืนข้อมูล  โปรแกรมลบข้อมูลหลายตัวมักใช้ DoD 5220.22-M เป็นมาตรฐาน

 วิธีการลบข้อมูลแบบ DoD 5220.22-M มักใช้ตามวิธีต่อไปนี้:


Pass 1: Read 0 and verify
Pass 2: Read one and verify
Pass 3: Write a random character and verify


https://www.datadestroyers.nl/technologie/dod_5220.22-m_data_wismethode.html
www.datadestroyers.nl 

DoD 5220.22-M

 รอบที่ 1: เขียนศูนย์ทับข้อมูลทั้งหมด
 รอบที่ 2: เขียนหนึ่งทับข้อมูลทั้งหมด
 รอบที่ 3: เขียนแบบสุ่มทับข้อมูลทั้งหมด


ต่อมามาตรฐาน "DoD 522.22-M" มักถูกแทนที่ด้วยมาตรฐานการล้างข้อมูล (Guidelines for Media Sanitization) อื่น ๆ เช่น   NIST 800 88 Purge
https://en.wikipedia.org/wiki/Data_erasure

DoD 5220.22-M วิธีการในการลบข้อมูลฮาร์ดดิสก์ โดยการเขียนทับหลายครั้ง เขียนทับมักอาจจะไม่เพียงพอ จำเป็นต้องมี การย่อยสลายและ หรือการทำลายทางกายภาพ (degauss)  ควบคู่กันไป


ในช่วงไม่กี่ปีที่ผ่านมา NIST (สถาบันมาตรฐานและเทคโนโลยีแห่งชาติ) เผยแพร่พิเศษของ NIST Special Publication 800-88  ตีพิมพ์โดยมีเจตนาที่จะให้ แนวทางปฎิบัติการลบข้อมูลสื่ออิเล็กทรอนิกส์ ของสหรัฐอเมริกา  เอกสารฉบับนี้ระบุถึงวิธีการที่เหมาะสมสำหรับการล้างข้อมูลในฮาร์ดไดรฟ์และสื่ออื่น ๆ ภายใต้ข้อแนะนำในการทำ (Sanitization)การทำลายข้อมูลเพื่อไม่ให้สามารถกู้กลับคืนมาได้

Guidelines for Media Sanitization
NIST Special Publication 800-88  download


วิธีที่ดีที่สุดเพื่อให้แน่ใจว่าข้อมูลจะถูกกำจัดออกไปเพื่อความปลอดภัยสูงสุดคือ การทำลายทางกายภาพ ด้วยวิธีนี้เราจะไม่สามารถกู้คืนข้อมูลจากเศษใด ๆ


แปะไว้ก่อน Is Full Disk Encryption The Strongest Defense Against Attack?

Digital Forensics:WIPE DoD

อ้างอิง
http://www.dss.mil/documents/odaa/nispom2006-5220.pdf
http://www.datasanitization.org/ 
https://www.thaicert.or.th/newsbite/2017-08-09-02.html
https://www.blancco.com/blog-dod-5220-22-m-wiping-standard-method/
https://www.datadestroyers.nl/technologie/dod_5220.22-m_data_wismethode.html
http://www.diskwipe.org/
https://en.wikipedia.org/wiki/Data_erasure

#wipe
#Sanitization
#Digital Forensics Certification

หมายเหตุ:เนื้อหาในเว็บไซต์นี้มีขึ้นเพื่อวัตถุประสงค์ในการให้ข้อมูลและเพื่อการศึกษาเท่านั้น

* หากมีข้อมูลข้อผิดพลาดประการใด ขออภัยมา ณ ที่นี้ด้วย  รบกวนแจ้ง Admin เพื่อแก้ไขต่อไป
ขอบคุณครับ

#WindowsForensic #ComputerForensics #dfir #forensics #digitalforensics #computerforensic #investigation #cybercrime #fraud

Volatility Lab

Volatility Lab  Image Wanna.vmem P.73 windows.info #python3  vol.py   -f '/home/kali/Desktop/Wanna/Wanna-MEM.vmem' windows.info     ...