Friday, October 28, 2016

Digital Forensics:Computer Forensics Tool Testing (CFTT)

Digital Forensics:Computer Forensics Tool Testing (CFTT)

องค์กรที่ทำหน้าที่โดยรวมในการกำกับดูแลการทดสอบและการรับรองเครื่องมือตรวจพิสูจน์พยานหลักฐานดิจิทัลในประเทศสหรัฐอเมริกาคือ  Computer Forensics Tool Testing (CFTT) ของ National Institute of Standards and Tesnology (NIST) พัฒนาวิธีการและทดสอบเครื่องมือเฉพาะทาง ต่างๆ

Computer Forensics Tool Testing Program (CFTT) 

ตัวอย่างผลการทดสอบ โปรแกรมสำหรับทำ สำเนาหลักฐานดิจิทัล  (Disk Imaging)

Computer Forensics Tool Testing

คุณลักษณะทั่วไปของเครื่องมือ ,ขั้นตอนการทดสอบ, หลักเกณฑ์การทดสอบ, ชุดทดสอบ และฮาร์ดแวร์สำหรับการทดสอบ เพื่อให้เป็นข้อมูลสำหรับผู้ผลิตในการปรับปรุงเครื่องมือ และผู้ที่สนใจเกิดความเข้าใจเกี่ยวกับความสามารถของเครื่องมือ และมั่นใจว่าเครื่องมือซอฟต์แวร์สำหรับตรวจพยานหลักฐาน ได้ผ่านการทดสอบแล้ว เป็นไปตามหลักการสากล
ในหมวด Disk Imaging จะมีซอฟต์แวร์หลายตัวที่ทดสอบแล้ว  ยกตัวอย่างในภาพนี้จะมีโปรแกรม FTK  Imager
Disk Imaging
FTK Imager v3.4.2.6
FTK Imager Test Results for Disk Imaging Tool
 FTK Imager v3.4.2.6  Test Results for Disk Imaging Tool  Download


ที่มา:
https://www.nist.gov/itl/ssd/software-quality-group/computer-forensics-tool-testing-program-cftt

หมายเหตุ:เนื้อหาในเว็บไซต์นี้มีขึ้นเพื่อวัตถุประสงค์ในการให้ข้อมูลและเพื่อการศึกษาเท่านั้น

* หากมีข้อมูลข้อผิดพลาดประการใด ขออภัยมา ณ ที่นี้ด้วย  รบกวนแจ้ง Admin เพื่อแก้ไขต่อไป
ขอบคุณครับ

#WindowsForensic #ComputerForensics #dfir #forensics #digitalforensics #computerforensic #investigation #cybercrime #fraud

Saturday, October 22, 2016

Digital Forensics: A Complete Anti-Forensics Guide

Digital Forensics: A Complete Anti-Forensics Guide

The average personal computer is a security nightmare, but what if i were to tell you there was a way around this, a way to make windows secure? VPNs, proxies and TOR only get you so far, but what do you do when they’ve traced it to your computer?
Anti-forensics is designed for this situation, to prevent them from proving you’ve done anything wrong even if they have your computer, its the art of leaving no trace, it is combating common forensic tools in preventing any penetration for forensic tests on your computer.
Anti-forensics can pretty much be summed up in one famous quote:
Make it hard for them to find you, and impossible for them to prove they’ve found you
Scott Berinato.
This article will teach you everything you need to know about anti-forensics to protect you and your privacy.

1) Disabling Time Stamps

Using Time Stamps, Forensic Experts can build a “Digital Time-Line”, this can be very compelling evidence when cross referenced with other known evidence. In order to strengthen security, we must disable these logs.
a) User Assist File
In the windows registry, there are settings that store logs and there respective dates of all launched programs, forensic experts can use this information to construct a digital time-line of your activity on the computer, disabling these settings is a key aspect of anti-forensics.
HKEY_Current_User\Software\Microsoft\Windows\CurrentVersion\Explorer\UserAssist
You should see two sub-keys called “Count”, delete both these keys, Now right click the UserAssist Key and Create a new key named “Settings”, In this key create “DWORD” value named “NoLog”, and set the value to 1.
Windows will no longer store logs of your activity.
b) Last Access Logs
Next we’ll disable the last access in windows. What last access is a setting on windows that allows you to see when you opened, modified, and/or created files on your computer and is similar to the “UserAssist” registry key. By disabling this forensic experts won’t as easily be able to tell when you’ve been accessing programs or files on your computer.
To disable last access, open CMD on your computer, and type the following command,
fsutil behavior set disablelastaccess 1
After typing this command, please restart your system and make sure that you’ve to use CMD as a administrator.

Disabling Time Stamps


2) Encrypting Your Computer

It is very important to make sure that your computer is encrypted, in the case an unwanted visitor is trying to access your computer, they will not be able to access to computer if it is encrypted.
Step 1 – TRUECRYPT
To encrypt your computer, you can use Truecrypt, a free program that allow you to encrypt your computer. When encrypting with this tool, you have two options – the first one is to create a hidden container, A hidden container is an OS that is impossible prove exists.
When creating a hidden container you’ll have 3 different passwords.
  • The first would be for your decoy system, the OS you would show someone forcing you to login your computer.
  • The second password would be for your outer volume, the OS you would show someone forcing you to login to the second partition on your computer.
  • Third password is for the hidden OS on the second partition of your computer, this OS is placed in the inner volume, and is impossible to prove exists.
The 2nd Option is just encrypt your HARD-DRIVE. This is also very secure, but you may be forced to give up your password due to court-order; in this situation many would think to simply say that they forgot their password, but doing so could get you held in contempt of court. With normal drive encryption, your computer is just as secure “Encryption Wise” and you’ll have a single password.
For more info, you can even visit their official website.
TRUECRYPT

Step 2 – Encrypt Your Keystrokes
It is imperative that you protect yourself from keyloggers, hackers will use these to steal log-in information and credit cards, the government uses keyloggers to spy on you. A few years ago, there was a lot of speculation about “CIPAV”, a government owned/coded piece of spyware, which would record the victim’s IP address, MAC address, open ports, operating system, installed applications, default web browser, time and date of log-ins, visited URLs, download history, and most critically, aLL typed keystrokes (that means all your accounts log-in information, credit cards, personal emails, everything). CIPAV was a huge invasion of privacy, and should serve as a reminder that you can never be too careful.

Encrypting your keystrokes is an excellent technique to protect yourself from keyloggers, it renders any tracking of typed keystrokes completely useless.
Keyscrambler is a program which can do just that, encrypting all keystrokes sent to a variety of popular applications; its premium version supports 170+ programs, though it is not free, and costs a hefty $45, you can alternatively use the free version, but it is obsolete when compared to the premium.

3) Making Encryption Secure

Encryption is pointless if it can be easily bypassed or overcome. You need to make sure that the encryption is secure too.
Step 1 – Make Sure Your Password Is Strong
Even with your computer encrypted, it is still vulnerable. Make sure your password is good (for optimal security, your password should be twenty or more characters, with symbols, numbers, and random capitals, and a special symbol (eg, ALT+1456) really increase security).
If you password is not strong enough, you can change it by right clicking your encrypted drive in TrueCrypt and selecting ‘Change Password’.
Step 2 – Create A Locked Screen Saver
Encryption is pointless if the feds get to your computer while its running. They can use live forensic tools that don’t require the movement or shutdown of a computer. A very simple technique to overcome this is to create a locked screen saver.
To create a locked screen saver in Windows Vista or Windows 7;
Right click your desktop and click on “Personalize”. In the bottom left hand corner you should see “Screen Saver” click that. Now, check “On Resume Display Log-on  Screen”, and set “Wait” to 5.
Now you must go to your Control Panel. Click on “System and Security” now click on “Power Options” find your selected plan and click “Change plan settings”; now, set “Turn Of Display” to “5 minutes”.
Step 3 – Get A Good Anti-Virus
This may seem obvious, but all this is pointless if you get infected with a keylogger that takes screen shots. Having a good anti-virus is one of the most important things you can do. Many people make the mistake of having a poor anti-virus; AVG, Norton, McAfee, all are awful anti-viruses. The only anti-virus programs I find worthy of my recommendation are ESET Nod32, Kaspersky, and BitDefender, these anti-viruses are very good, but quality comes with a price-tag and you might find them a bit too expensive for your taste.
Anti-Virus

4) Disable and Remove USB Logs

Next on the list of Anti-Forensics in to disable logs of USB activity, flash drives, etc… This can be valuable if you have a flash drive with sensitive data and you don’t want any logs of it ever being plugged it to your computer.
Step 1 – Delete the USBSTOR Registry Setting
In your registry, there is a key called “USBSTOR”, which logs all information on USB devices interpreted by your computer; brand name and model, size of the device, date and time pluxed in, etc..
Forensic experts can and will use this to match your computer to USB devices.
Deleting this registry key is not as simple as most others, it has special permissions that can be hard to bypass. To delete this key, we will use a tool from Microsoft called “PsExec“.
Once you have it downloaded, extract the RAR file to your desktop. Open up Command Prompt (as Administrator) and type the following into the command line;
cd C:\Users\%Username%\Desktop\PsExec
This will cause Command Prompt to navigate to your desktop, once this is done type the following into the command line;
psexec -i -d -s c:\windows\regedit.exe
The Regstry Editor window will open, with full permissions. Browse to the following directory
HKEY_LOCAL_MACHINE\System\CurrentControlSet\Enum\USBSTOR
Now, right click “USBSTOR” and hit ‘Delete’, then confirm that you want to delete the key, congratulations- the key has been deleted.
USBSTOR Registry
Step 2 – Delete The Setupapi.log File
The Setuppapi log is a plain-text file that stores the list of installed USB devices and their drivers. We will delete it with a program called “CCleaner”.
CCleaner is actually one of the best tools that anti-forensic has to offer, it does a great job of securely wiping files (assuming you have it set to delete securely), for specific instructions, see the “Wipe With CCleaner” section of the guide.

5) Windows Security Misc.

This section is for various information that is important to anti-forensics, but isn’t quite big enough to have its own section within the article.
Step 1 – Disable System Restore Points
System Restore points can be used to bring your computer back to a date when it wasn’t secure and can also be used to restore overwritten files.
To disable System Restore points, right click “Computer” and click “Properties”, Now click “Advanced System Settings” Under “System Protection”, click “Configure Now”
Select Turn Off System Protection and apply it.
Step 2 – Disable Send Error Report to Microsoft
This is self-explanatory, we obviously don’t want Microsoft having logs of all our crashed programs.
To do this, go to your start menu and search ‘problem reporting settings’ and then click on ‘Choose How To Report Problems’. Click ‘Change Report Settings For All Users’ and then set it to ‘Never check for solutions’.
Step 3 – Wipe With CCleaner
This is the heart of Anti-Forensics right here. CCleaner is actually one of the most powerful Anti-Forensic tools, IF used correctly.
As it turns out, when deleting files, you DO NOT need to do multiple overwrites. With modern hard-drives, one overwrite really is enough to delete a file beyond repair, even though it is popular belief that you need several overwrites to be secure. With CCleaner, I would recommend two overwrites, just in-case it misses something the first time around (remember, it freeware).
CCleaner
Once you have CCleaner installed, run it (as administrator), go to Settings and make sure you have it set to overwrite deleted data with three passes.
Go back to Cleaner and check everything then hit Run Cleaner. You might want to leave this on overnight depending on how many files it has to clean.
Do this every time you are done with a major hacking job. When using CCleaner normally (what should be every time you are done with your computer), uncheck Wipe Free Space this will cut down the time from hours to a few minutes.
Step 4 – Disable Debugging Upon Failure
This keeps logs of your computers failures and blue screen info. To disable it, right click Computerand go to “Advanced System Settings”, now go to “Start Up and Recovery” None, set Debugging Information to None.
Step 5 – Disable Windows Event Logging
Windows keeps logs of all events on the computer. First, before we disable, we must clear all the logs.
To disable it, go to Control Panel then System and Security. Now, click Administrative Tools, and then Event Viewer. In either pane of the Event Viewer window, right-click System and then select Clear All Events, click No to the dialog box that will open.
Now we must disable Windows Event Logging. Go to Run and type in “msconfig” then go to ‘Services’ and make sure ‘Hide all Microsoft Services’ is unchecked. Now scroll down until you find Windows Event Logging, and uncheck it.
Now restart your computer right away.
Step 6 – Disable Windows Hibernation
You may as well hand your computer over to the feds if they raid your house and your computer is in hibernation. Also, putting your computer into hibernation is pretty much just taking a screen shot of your RAM that gets saved to your hard drive.
Open your Control Panel. Click System and Security, then click ‘Power Options’, Click ‘Change plan settings’ for you current power plan.
Now click “Change advanced power settings” Expand “Sleep” then expand “Hibernate After” Enter 0 for Setting
Hibernation is now disabled.
Step 7 – Disable Stand By In Registry
Disabling standby is necessary for the same reasons that disabling hibernation is. For this step, I have prepared a pre-written code;
HKEY_LOCAL_MACHINE\SYSTEM\CurrentControlSet\Services\ACPI\Parameter…
Simply create a new text file on your desktop, paste the above code in it, and save it has standby.reg then double click the .regfile and click Ok to dialog box that will appear.
…All Credit Goes to r00t3r[dot]com (Saurfang)

yeahhub

หมายเหตุ:เนื้อหาในเว็บไซต์นี้มีขึ้นเพื่อวัตถุประสงค์ในการให้ข้อมูลและเพื่อการศึกษาเท่านั้น

* หากมีข้อมูลข้อผิดพลาดประการใด ขออภัยมา ณ ที่นี้ด้วย  รบกวนแจ้ง Admin เพื่อแก้ไขต่อไป
ขอบคุณครับ

#WindowsForensic #ComputerForensics #dfir #forensics #digitalforensics #computerforensic #investigation #cybercrime #fraud 

DIGITAL FORENSICS:Facebook Forensics Toolkit

DIGITAL FORENSICS:Facebook Forensics Toolkit


The Facebook Forensic Toolkit (FFT) Setup Wizard page, click Next.


  Click Install Now to continue with the application setup.
 Click Install.
 Click Run Facebook Forensic Toolkit (FFT) button.


 In the opening window, click the Examine Profile and Clone Data option.

In the New Case - Information window, click the browse button next to “Location of examination results.”


 click All slider button.

 On the Profile information on Facebook page, click LOGIN AS ACCOUNT HOLDER.

When prompted to authenticate with a valid logon, enter valid Facebook logon credentials, and click Authenticate.
 
 click Start on the right.
The next page.
Examine the information in each category.

 Report


Reference:

ShuvoSarker7


หมายเหตุ:เนื้อหาในเว็บไซต์นี้มีขึ้นเพื่อวัตถุประสงค์ในการให้ข้อมูลและเพื่อการศึกษาเท่านั้น

* หากมีข้อมูลข้อผิดพลาดประการใด ขออภัยมา ณ ที่นี้ด้วย  รบกวนแจ้ง Admin เพื่อแก้ไขต่อไป
ขอบคุณครับ


#WindowsForensic #ComputerForensics #dfir #forensics #digitalforensics #computerforensic #investigation #cybercrime #fraud

Sunday, October 16, 2016

Digital Forensics: วิธียึดคอมพิวเตอร์

  Digital Forensics: วิธียึดคอมพิวเตอร์

วิธียึดคอมพิวเตอร์

Seizing and Preserving an Electronic Device

     ปัจจุบันนี้ พยานหลักฐานทางอิเล็กทรอนิกส์มีความเกี่ยวพันกับคดีต่าง ๆ เกือบทุกคดี ไม่ว่าทางตรงหรือทางอ้อม ดังนั้น การยึดเครื่องคอมพิวเตอร์จึงมีความสำคัญเป็นอย่างมาก และมีผลต่อความน่าเชื่อถือในการพิจารณาคดีในชั้นศาล สำหรับข้อแนะนำในการเข้าตรวจค้นและยึดพยานหลักฐานทางอิเล็กทรอนิกส์ในเบื้องต้นมี ดังนี้


    1) คำนึงถึงความปลอดภัยของเจ้าหน้าที่เป็นอันดับแรก

    2) วาดแผนที่ในภาพรวมเช่นเดียวกับคดีทั่วไป
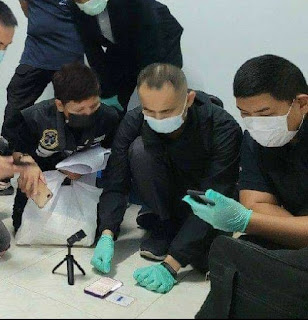
    3) สวมถุงมือขณะตรวจค้นและยึดเพื่อป้องกันการปนเปื้อนของพยานหลักฐาน

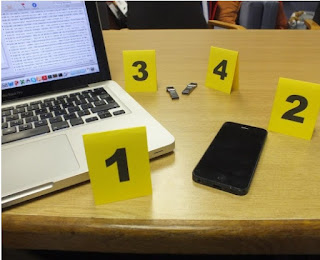
    4) วางป้ายระบุลำดับที่ของจุดต่าง ๆ พร้อมถ่ายภาพไว้ในทุกขั้นตอน
crime scene
    5) กันผู้ต้องสงสัยออกจากเครื่องคอมพิวเตอร์

    6) ตรวจสอบสถานะของเครื่องคอมพิวเตอร์ว่าเปิดอยู่หรือปิดอยู่ ถ้าเครื่องคอมพิวเตอร์ปิดอยู่ให้ข้ามไปที่ข้อ 7) ถ้าไม่มั่นใจให้พิจารณา ดังนี้
        - ตรวจจอภาพว่าพักหน้าจอ (โดยการขยับเมาส์) หรือ ปิดหน้าจออยู่ (โดยการกดปุ่มเปิด/ปิดที่หน้าจอ)
        - ถ่ายภาพที่ปรากฎบนหน้าจอคอมพิวเตอร์ ให้ปรากฎวันที่และเวลาบริเวณหน้าจอภาพ เทียบกับเวลาของเครื่องโทรศัพท์เคลื่อนที่ซึ่งมีการตั้งค่าให้ซิงค์กับ Time Server เรียบร้อยแล้ว กรณีที่มีหน้าต่างซ้อนกันหลาย ๆ หน้าต่าง ให้คลิ๊กเลือกทีละหน้าต่าง แล้วถ่ายภาพเก็บเป็นหลักฐานเอาไว้
        - ในกรณีที่ไม่เข้าเงื่อนไขตามที่กล่าวมาแล้ว เช่น มีไฟล์กำลังถูกลบ, ติดรหัสผ่าน เป็นต้นก็ให้ดึงปลั๊กออกจากหลังเครื่องคอมพิวเตอร์ ถ้าเป็นเครื่องคอมพิวเตอร์แบบพกพาให้ถอดแบตเตอร์รี่ก่อน ยกเว้นในกรณีที่เป็นเครื่องคอมพิวเตอร์แบบแม่ข่ายรันระบบปฏิบัติการ Windows Server รุ่นต่าง ๆ , ระบบ Unix ให้ใช้วิธีการ Shutdown แทนการดึงปลั๊กออกจากหลังเครื่อง

    7) ติดป้ายกำกับเป็นคู่ไว้บริเวณจุดเชื่อมต่อของเครื่องคอมพิวเตอร์ กับ สายที่เชื่อมต่อ ดังรูป

    8) การถ่ายภาพควรถ่ายให้เห็นภาพรวม จุดเชื่อมต่อ และรายละเอียดของอุปกรณ์ที่ยึดทั้งหมด โดยเฉพาะหมายเลขประจำเครื่อง จากนั้น ดำเนินการบรรจุเครื่องคอมพิวเตอร์ที่ต้องการยึดลงในกล่อง ถุงพลาสติก แล้วปิดผนึกด้วยเทปกาว พร้อมลงลายมือชื่อกำกับไว้


     9) บันทึกรายละเอียดของเครื่องคอมพิวเตอร์ที่ยึด ลงลายมือชื่อผู้ยึด พร้อมระบุวันเดือนปีและเวลาที่ยึด เมื่อมีการส่งมอบพยานหลักฐานทางอิเล็กทรอนิกส์ ให้จดบันทึกเหตุผลในการส่งมอบ พร้อมลงลายมือชื่อผู้รับ และ ผู้ส่งมอบ พร้อมระบุวัน เวลา ให้ชัดเจน เพื่อเป็นการรักษาห่วงโซ่ของพยานหลักฐานให้มีความน่าเชื่อถือตลอดเวลา


   10) การเคลื่อนย้ายพยานหลักฐานทางอิเล็กทรอนิกส์ ควรหลีกเลี่ยงสัญญาณวิทยุกำลังสูงภายในรถยนต์สายตรวจ สนามแม่เหล็ก โดยระวังในเรื่องการกระแทก ความเปียกชื้น และความร้อน เพราะอาจทำให้พยานหลักฐานทางอิเล็กทรอนิกส์เกิดความเสียหายได้


*** ข้อควรระวัง ***
  • พบเครื่องคอมพิวเตอร์ปิดอยู่ ห้ามเปิดเครื่อง
  • กรณีที่มีความซับซ้อน ให้ขอความช่วยเหลือจากผู้เชี่ยวชาญ
ทีมา:


อ่านเพิ่มเติม

หมายเหตุ:เนื้อหาในเว็บไซต์นี้มีขึ้นเพื่อวัตถุประสงค์ในการให้ข้อมูลและเพื่อการศึกษาเท่านั้น

* หากมีข้อมูลข้อผิดพลาดประการใด ขออภัยมา ณ ที่นี้ด้วย  รบกวนแจ้ง Admin เพื่อแก้ไขต่อไป
ขอบคุณครับ

#WindowsForensic #ComputerForensics #dfir #forensics #digitalforensics #computerforensic #investigation #cybercrime #fraud

Saturday, October 15, 2016

DIGITAL FORENSICS:วิธีการถอดเทปเสียงอัตโนมัติ

DIGITAL FORENSICS:วิธีการถอดเทปเสียงอัตโนมัติ


 กองบังคับการปราบปรามการกระทำความผิดเกี่ยวกับอาชญากรรมทางเทคโนโลยี - บก.ปอท.
วิธีการถอดเทปเสียงอัตโนมัติ ด้วยโปรแกรม VB-Cable และ Google Docs

1. ดาวน์โหลดโปรแกรม VB-CABLE จาก https://www.vb-audio.com/Cable แล้ว Extract File > คลิกขวาที่ VBCABLE_Setup_x64 สำหรับเครื่อง 64-bit > เลือก Run as administrator > Install

2. ตั้งค่า Sound ตามภาพ

3. เปิด Google Docs ไปที่ "เครื่องมือ" แล้วเลือก "พิมพ์ด้วยเสียง" จะปรากฏสัญลักษณ์ไมโครโฟน เลือกภาษาต้นทางที่ต้องการถอดเทป

4. เปิดโปรแกรมที่ต้องการจะถอดเทป เช่น Youtube , วิดีโอบน Facebook , วิดีโอหรือเสียงบนโปรแกรมอื่นๆ แล้วกดเล่นสื่อดังกล่าว

5. รีบกลับมาที่ Google Docs คลิกสัญลักษณ์รูปไมโครโฟน จะเปลี่ยนเป็นสีส้ม

6. Google Docs เริ่มพิมพ์อัตโนมัติ โดยไม่มีเสียงดังออกมา ระหว่างนี้ หากสลับไปยังโปรแกรมอื่น Google Docs จะหยุดทำงานทันที

7. เมื่อพิมพ์เสร็จ ฟังและอ่านตรวจทานอีกครั้ง


......................................................................

การถอดเทปเสียง ด้วย Google Document

การถอดเทปเสียงด้วย Google Document

การถอดเทปเสียงนั้นใช้เวลาที่มาก ด้วยเทคโนโลยีในปัจจุบันทำให้เราสามารถย่อเวลาการถอดเทปได้

วิธีการถอดเทป

  1. เป็นสมาชิก Gmail ค่ะ แล้ว Login เข้า Gmail ของท่าน
  2. สร้าง "เอกสาร" ใหม่ โดยไปที่ Google Drive  https://drive.google.com/drive/u/0/my-drive  เลือก "ใหม่" และเลือก " Google เอกสาร" หรือจะไปที่ Google Doc  https://docs.google.com/document/u/0/  แล้วกดเครื่องหมาย  + ที่อยู่มุมซ้ายล่าง
  3. ไปที่ "เครื่องมือ" เลือก "พิมพ์ด้วยเสียง"
  4.  นำสาย AUX มาใช้
* นำสาย AUX เสียบที่ หูฟัง และเสียบที่ไมโครโฟนของเครื่อง เมื่อเล่น MP3 จากคอมพิวเตอร์
* นำสาย AUX ด้านหนึ่งเสียบที่หูฟังของเครื่องเล่น MP3 มือถือ หรืออื่นๆ และอีกด้านหนึ่งเสียบที่ไมโครโฟนของเครื่อง Notebook / PC
http://mp3totext.blogspot.com/2016/08/google-document.html

5. เปิดเสียง MP3 Google จะทำการพิมพ์เสียงที่ได้ยินค่ะ อย่างไรก็ตามความถูกต้องของข้อความขึ้นกับหลายปัจจัย เช่นความชัดของเสียง ความเร็วของคำพูด ความเร็วของอินเตอร์เน็ต ซึ่งถ้าเกิดจากความเร็วของคำพูด ท่านสามารถเลือกโปรแกรมเล่น MP3 ที่มีฟังก์ชันลดความเร็วของเสียง เช่น Window Media player เพื่อให้พูดช้าลงได้


ที่มา : 

กองบังคับการปราบปรามการกระทำความผิดเกี่ยวกับอาชญากรรมทางเทคโนโลยี - บก.ปอท.

mp3totext

Saturday, October 8, 2016

Digital Forensics:การเก็บรวบรวมหลักฐานโทรศัพท์เคลื่อนที่ (Evidence collection)

Digital Forensics:การเก็บรวบรวมหลักฐานโทรศัพท์เคลื่อนที่ (Evidence collection)

(1) ห้ามบุคคลที่ไม่มีส่วนเกี่ยวข้องเข้าไปในสถานที่เกิดเหตุ 

(2) ควรสวมถุงมือระหว่างการปฏิบัติงานในสถานที่เกิดเหตุ 

Forensic Imaging & DATA Extraction

(3) กำหนดรูปแบบการตรวจค้นสถานที่เกิดเหตุและดำเนินการตามที่กำหนดอย่างถี่ถ้วน 

(4) กำหนดหมายเลขและวางป้ายหมายเลขกำกับหลักฐานแต่ละชิ้น

Forensic Imaging & DATA Extraction

(5) ถ่ายภาพรายละเอียดต่อไปนี้ 

(5.1) หากพบเครื่องมือสื่อสารเคลื่อนที่ ให้ถ่ายภาพทุกด้านและพื้นที่รอบ ๆ หลักฐานที่จะจัดเก็บ อุปกรณ์เชื่อมต่อภายนอกและจุดเชื่อมต่อ รวมทั้งสภาพโดยรวมให้ เห็นว่าหลักฐานแต่ละชิ้นวางไว้ในตำแหน่งใด 

(5.2) ข้อมูลเฉพาะของหลักฐาน เช่น หมายเลข Serial number ผู้ผลิต รุ่น ความเสียหายที่พบ เป็นต้น

(5.3) สิ่งอื่นที่อาจเป็นประโยชน์เพิ่มเติม เช่น สิ่งพิมพ์ กระดาษบันทึกข้อความ หรือหนังสือ เกี่ยวกับความรู้ทางคอมพิวเตอร์เพื่อบ่งบอกถึงระดับความรู้ทางคอมพิวเตอร์ของผู้ต้อง สงสัย

(6) จดบันทึกรายละเอียดต่อไปนี้

(6.1) สิ่งที่พบ สิ่งที่ได้ดำเนินการ รวมถึงสิ่งผิดปกติเช่น ร่องรอยความเสียหายภายนอกของ หลักฐาน 

(6.2) สภาพและรายการอุปกรณ์ภายนอกที่เชื่อมต่อกับหลักฐาน 

(6.3) สิ่งอื่นที่อาจเป็นประโยชน์เพิ่มเติม เช่น สิ่งพิมพ์ กระดาษบันทึกข้อความ หรือหนังสือ เกี่ยวกับความรู้ทางคอมพิวเตอร์เพื่อบ่งบอกถึงระดับความรู้ทางคอมพิวเตอร์ของผู้ต้อง สงสัย 

(7) กรณีพบหลักฐานอยู่ภายนอกอาคาร และสภาพอากาศขณะนั้นอาจส่งผลต่อหลักฐาน ควร พิจารณาดำเนินการกับหลักฐานนั้นเป็นลำดับแรก 

(8) รวบรวมข้อมูลที่เกี่ยวข้อง เช่น ชื่อผู้ใช้ รหัสผ่าน ข้อมูลในการเข้าใช้งานระบบปฏิบัติการ หรือ ระบบเครือข่าย การใช้เทคโนโลยีเฉพาะ เช่น   การเข้ารหัสลับข้อมูล (Encryption) เป็นต้น


กรณีหลักฐานเป็นเครื่องมือสื่อสารเคลื่อนที่ 

(1) หากทำได้ ให้สอบถามรหัสผ่านเพื่อปลดล็อคเครื่องและซิมการ์ด และจดบันทึกโดยให้ระบุด้วย ว่าเป็น PIN หรือ Pattern lock 

Photo illustration by Aurich Lawson

(2) ในกรณีที่หลักฐานเปิดใช้งานอยู่ และสามารถเข้าใช้งานได้ ควรดำเนินการดังนี้ 

(2.1) ตรวจสอบรายละเอียดเกี่ยวกับหลักฐาน และตั้งค่าเครื่องมือสื่อสาร ดังนี้ 

ก. บันทึกภาพหลักฐานและเนื้อหาที่ปรากฏบนหน้าจอแสดงผล และจดบันทึกข้อมูล โดยละเอียด 

ข. ตรวจสอบข้อมูลเฉพาะของหลักฐาน เช่น IMEI รุ่น ผู้ให้บริการ เป็นต้น 

iPhone IMEI Check
iPhone IMEI Check  (Photo by Jarod Lee).

ค. เปิดการใช้งานโหมดเครื่องบิน (Airplane mode) เพื่อตัดการรับสัญญาณ 

Forensic Imaging & DATA Extraction
(Photo by Jakub Porzycki/NurPhoto via Getty Images).

ง. ปิดการใช้งานสัญญาณไร้สาย (Wi-Fi) เพื่อตัดการสื่อสารผ่านระบบเน็ตเวิร์ก 

จ. ปิดการใช้งานสัญญาณบลูทูธ (Bluetooth) 

ฉ. ปิดการใช้รหัสผ่าน เพื่อให้สามารถเข้าถึงเครื่องได้ภายหลัง 

ช. ปิดการล็อคหน้าจอแสดงผล (Disable screen lock) 

(2.2) ดำเนินการบรรจุและเคลื่อนย้ายหลักฐาน 

(3) กรณีที่ไม่สามารถเข้าใช้งานหลักฐานได้ เช่น ติดล็อครหัสผ่าน ให้บันทึกภาพหลักฐานและ เนื้อหาที่ปรากฏบนหน้าจอแสดงผล และจดบันทึกโดยละเอียด หลังจากนั้นจึงดำเนินการบรรจุ และเคลื่อนย้ายหลักฐาน 

Forensic Imaging & DATA Extraction

(4) กรณีที่หลักฐานอยู่ในสถานะปิดการใช้งาน ให้ดำเนินการบรรจุและเคลื่อนย้ายหลักฐาน 

(5) ไม่ควรถอดแบตเตอรี่ออกจากตัวเครื่องเนื่องจากอาจทำให้สูญเสียข้อมูล เช่น ประวัติการโทร การ ตั้งค่าวันเวลาในหลักฐาน เป็นต้น เว้นแต่ในกรณีที่จำเป็นต้องเก็บเครื่องเป็นระยะเวลานาน ควร ถอดแบตเตอรี่ออกเพื่อป้องกันแบตเตอรี่เสื่อมสภาพซึ่งอาจทำให้สารที่อยู่ในแบตเตอรี่รั่วซึมและ ก่อให้เกิดความเสียหายแก่หลักฐานนั้นได้ 

(6) เก็บอุปกรณ์เสริมทั้งหมด เช่น สายเคเบิลสำหรับชาร์จไฟ สายเคเบิลข้อมูลสำหรับต่อเชื่อม SD card ซิมการ์ด เป็นต้น รวมทั้งตรวจดูบริเวณรอบ ๆ ว่ามีการจดรหัสผ่านไว้หรือไม่ หากพบให้ รวบรวมไว้

Photo: Michael Hession ELECTRONICSACCESSORIES

(7) หากพบเครื่องมือสื่อสารเคลื่อนที่อยู่ในน้ำ ให้รีบถอดแบตเตอรี่ออกทันที แล้วจัดเก็บอุปกรณ์ ในสภาพที่มีน้ำในแหล่งที่พบหลักฐานอยู่ และนำกลับไปตรวจวิเคราะห์ในห้องปฏิบัติการ โดยเร็ว 

การบรรจุและการเคลื่อนย้าย (Packaging and Transportation)

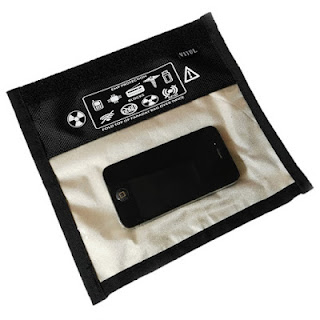
(1)กรณีหลักฐานเป็นเครื่องมือสื่อสารเคลื่อนที่ซึ่งสถานะของเครื่องเปิดใช้งานและติดรหัสผ่าน ทำให้ ไม่สามารถตั้งค่าอุปกรณ์เพื่อตัดสัญญาณได้ ให้บรรจุหลักฐานลงในอุปกรณ์ป้องกันคลื่นสัญญาณ ก่อน แล้วจึงดำเนินการในขั้นตอนต่อไป 

Forensic Imaging & DATA Extraction

(2)จัดเก็บหลักฐานลงในบรรจุภัณฑ์ ใช้เทปปิดผนึกปิดผนึกหลักฐานให้เรียบร้อย ไม่ให้มีรอยชำรุดฉีก ขาด ลงชื่อผู้ปฏิบัติงานและวันเวลาคร่อมทับเทปปิดผนึกกำกับไว้ 

Forensic Imaging & DATA Extraction

mobile phone evidence box


(3)ติดป้ายหมายเลขกำกับ (Label) หลักฐานลงบนบรรจุภัณฑ์ทุกชิ้น โดยห้ามติดบนหลักฐานโดยตรง
Forensic Imaging & DATA Extraction

(4)ในการดำเนินการควรระบุรายละเอียดใน Chain of custody โดยบันทึกข้อมูลให้ครบถ้วน

(5)ควรขนย้ายหลักฐานมายังยานพาหนะเป็นลำดับสุดท้ายก่อนที่จะออกจากสถานที่เกิดเหตุและขน ย้ายหลักฐานไปเก็บในที่ปลอดภัยทันทีที่ถึงจุดหมายปลายทาง 

(6)เคลื่อนย้ายหลักฐานด้วยความระมัดระวังเป็นพิเศษ หลีกเลี่ยงการกระทบกระเทือน การวาง หลักฐานซ้อนทับกัน บริเวณที่มีสนามแม่เหล็กไฟฟ้าหรือไฟฟ้าสถิต เช่น ใกล้ลำโพงและวิทยุสื่อสาร เป็นต้น บริเวณที่มีแสงแดดจัดหรือมีความชื้นและการเปลี่ยนแปลงของอุณหภูมิหรือความชื้น กะทันหัน 

(7)ในการรับและส่งมอบหลักฐาน ก่อนส่งมอบให้สังเกตสภาพบรรจุภัณฑ์ว่าชำรุดหรือไม่ เทปปิดผนึก ฉีกขาดหรือไม่ และถ่ายภาพสภาพหลักฐานที่ได้รับมา 

ภาคผนวก ข ข้อมูลเพิ่มเติมทางเทคนิค 

ข.1 การเทียบเวลา ระหว่างกระบวนการเก็บหรือสำเนาหลักฐานดิจิทัล ผู้ปฏิบัติงานจำเป็นต้องเทียบเวลาของหลักฐาน ดิจิทัล กับเวลามาตรฐาน และให้บันทึกความคลาดเคลื่อนจากเวลามาตรฐาน โดยให้บันทึกเป็นหน่วย ของเวลาระดับที่ละเอียดที่สุดที่จะทำได้ ตัวอย่างของเวลามาตรฐาน ได้แก่ เวลาจากนาฬิกามาตรฐาน ของสถาบันมาตรวิทยาแห่งชาติ (รายละเอียดของนาฬิกาอ้างอิงสามารถดูเพิ่มเติมได้ที่ http://www.nimt.or.th/index.php?menu=time) 

ข.2 การตรวจสอบข้อมูลที่สำคัญในเครื่องมือสื่อสารเคลื่อนที่ ตามหลักการแล้ว ผู้ปฏิบัติงานไม่ควรเปิดดูข้อมูลในเครื่องมือสื่อสารเคลื่อนที่โดยไม่จำเป็น เพราะจะทำ ให้ข้อมูลในหลักฐานเปลี่ยนแปลง แต่เพื่อประโยชน์ในการสืบสวน ก่อนที่จะสำเนาข้อมูลหรือส่งตรวจ ในห้องปฏิบัติการ ผู้รับผิดชอบคดีอาจพิจารณาตรวจดูเฉพาะข้อมูลที่สำคัญอย่างระมัดระวัง และทำให้ ข้อมูลเปลี่ยนแปลงน้อยที่สุด โดยตรวจสอบข้อมูลดังนี้ 

(1) ตรวจสอบ IMEI โดยกด *#06# 

(2) ตรวจสอบหมายเลขโทรศัพท์ โดย 

ก. สำหรับเครือข่าย AIS กด *545# แล้วกดโทรออก 

ข. สำหรับเครือข่าย DTAC กด *102# แล้วกดโทรออก 

ค. สำหรับเครือข่าย TRUE กด *933# แล้วกดโทรออก 

(3) ตรวจสอบชื่อบัญชีของแอปพลิเคชันที่ใช้ติดต่อสื่อสาร เช่น อีเมล, LINE และ Facebook เป็นต้น


อ่านเพิ่มเติม: 

ที่มา:ข้อเสนอแนะมาตรฐานการจัดการอุปกรณ์ดิจิทัล ในงานตรวจพิสูจน์พยานหลักฐาน (สํานักพัฒนาธุรกรรมทางอิเล็กทรอนิกส์)

หมายเหตุ:เนื้อหาในเว็บไซต์นี้มีขึ้นเพื่อวัตถุประสงค์ในการให้ข้อมูลและเพื่อการศึกษาเท่านั้น

* หากมีข้อมูลข้อผิดพลาดประการใด ขออภัยมา ณ ที่นี้ด้วย  รบกวนแจ้ง Admin เพื่อแก้ไขต่อไป
ขอบคุณครับ

#WindowsForensic #computerforensic #ComputerForensics #dfir #forensics #digitalforensics #investigation #cybercrime #fraud #พยานหลักฐานดิจิทัล

DIGITAL FORENSICS: BINWALK CTF

 DIGITAL FORENSICS: BINWALK CTF วันนี้แอดมาแนะนำหลักสูตร ด้านความมั่นคงปลอดภัยไซเบอร์ (Basic Cyber security) สำหรับผู้เริ่มต้นศึกษามี Lab ให...