Saturday, March 28, 2020

DIGITAL FORENSICS:Investigation using OSForensics

DIGITAL FORENSICS: Investigation using OSForensics (Part1)


Step 1 - Download USB Drive Images

In this task, you will download the USB drive images from a local intranet site.
These USB drive images were collected from digitalcorpora.org web site.
Right-click USB zip file and select Extract All

Step 2

Click Start charm to access the Start screen.
When Start screen opens, type: OSforensics  On the OSForensics welcome message box, click Continue Using Free Version.
DIGITAL FORENSICS:Investigation using OSForensics
OSForensics

Step 3

In the New Case dialog box, enter your name in the Investigator text box. In the Case Name text box, type CF-DFE-002 USB drive.
Investigation using OSForensics

Investigation using OSForensics
CF-DFE-002

Step4

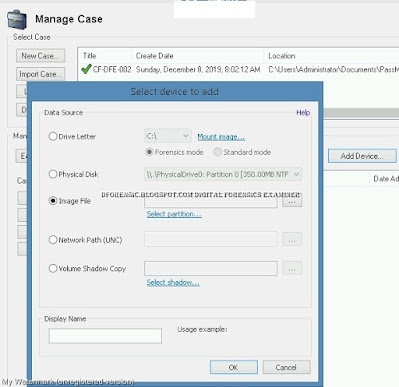
Click the Add Device button to open the “Select device to add” dialog box, and then click the Image File option button. Click the browse button, navigate to the folder you copied images to, and click  work-usb-2009-12-11.E01. Click Open.

Investigation using OSForensics
Image File
Investigation using OSForensics
work-usb-2009-12-11.E01

Step 5

Click the  work-usb-2009-12-11.E01 filename at the lower right, and then click the Open button to the left to open the File System Browser window.


Investigation using OSForensics

Step 6

In the Select a partition in the image dialog box asking which partition to use, leave the default setting use entire image file, and then click OK.


Step 7

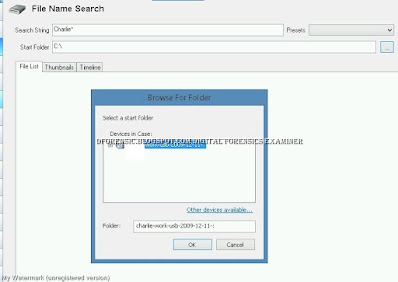
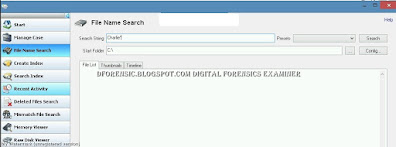
Click the File Name Search icon in the File System Browser window or the left pane of the main window. In the Search String text box, type Charlie*. On the far right, click the Search button.
 
Investigation using OSForensics
File Name Search

Step 8

On the Browse for Folder dialog box, ensure that Devices in case refers to  work-usb-2009-12-11.
Click OK. Back on File Name Search window, click Search.

Investigation using OSForensics


Step 9

After a few moments a list of files found in USB drive is displayed.
Investigation using OSForensics

Step 10

The files displayed in Thumbnails view.
Click Timeline tab.

Investigation using OSForensics
Timeline

Create Index

To create an index of files found in the user’s USB drive image, perform the following steps:

Step 11

Click the Create Index button in the left pane. (Note: You might have to click New Index if the window is showing the results from the index of  USB drive.) In the Step  click the Pre-determined File Types option button, click all the file types listed, and then click Next.

Investigation using OSForensics


Step 12

 click the Add button.

Step 13

On the Add Start Location dialog box, verify that Whole drive option is selected and  work-usb-2009-12-11.E01 is listed.
Click OK.
Investigation using OSForensics
Add Start Location

Step 14

In the Step 3 of 5 window, in the Index Title text box, type: All File Type
Click Start Indexing.

Investigation using OSForensics

Index Title

Step 15

When the indexing is finished, click OK in the message box informing you that some errors might have occurred in the indexing process.

 
Investigation using OSForensics

Step 16

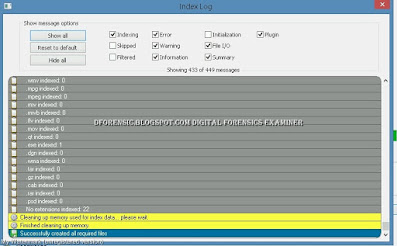
The window that opens shows you the files that were indexed, any errors that occurred, and a summary of what was done. After examining the summary, close the window.
Investigation using OSForensics

You should now be able to create a case, add it to your inventory, scan the files, and perform indexing, which will be useful later for searching.   

Case Management: Cases are used to group together findings within OSForensics that can be exported or saved for later analysis.


ref:

osforensics

hackingarticles

#WindowsForensic #ComputerForensics #dfir #forensics #digitalforensics #computerforensic #investigation #cybercrime #fraud


หมายเหตุ:เนื้อหาในเว็บไซต์นี้มีขึ้นเพื่อวัตถุประสงค์ในการให้ข้อมูลและเพื่อการศึกษาเท่านั้น
* หากมีข้อมูลข้อผิดพลาดประการใด ขออภัยมา ณ ที่นี้ด้วย  รบกวนแจ้ง Admin เพื่อแก้ไขต่อไป
ขอบคุณครับ


Thursday, March 26, 2020

DIGITAL FORENSICS: CertMaster Learn for IT Fundamentals (ITF+) free

DIGITAL FORENSICS: CertMaster Learn for IT Fundamentals (ITF+)

free


To access the free CompTIA CertMaster Learn for IT Fundamentals (ITF+) course visit 

https://certs.comptia.org/means_more/


Lesson 1: Common Computing Device

CertMaster Learn for IT Fundamentals (ITF+)

CompTIA IT Fundamentals

Welcome to CompTIA CertMaster Learn for IT Fundamentals+!


  1. Go to the CompTIA CertMaster Learn Registration Page.
  2. Enter the access code and click continue.
  3. If you have previously used CertMaster Learn or CertMaster CE and have a user account, select Log In.  If you do not have a user account, enter Full Name, Email, and Password as directed. 
  4. Now that your access code has been redeemed, access the new course at any time from the CertMaster Learn Log-In page.


 หลักสูตรอบรมออนไลน์ 

 Ref:

https://learn.comptia.org


หมายเหตุ:เนื้อหาในเว็บไซต์นี้มีขึ้นเพื่อวัตถุประสงค์ในการให้ข้อมูลและเพื่อการศึกษาเท่านั้น

* หากมีข้อมูลข้อผิดพลาดประการใด ขออภัยมา ณ ที่นี้ด้วย  รบกวนแจ้ง Admin เพื่อแก้ไขต่อไป
ขอบคุณครับ

#WindowsForensic #ComputerForensics #dfir #forensics #digitalforensics #computerforensic #investigation #cybercrime #fraud

Monday, March 16, 2020

DIGITAL FORENSICS:Network Evidence Collection.

DIGITAL FORENSICS:Network Evidence Collection.

Tools
- NetworkMiner_2-0
- Wireshark-win32-2.6.1
- Windows 7 forensic workstation

Evidence Collection.


In order to conduct a proper examination of log files and other network data such as packet

captures, they often have to be moved from the log source and examined offline. As with

any source of evidence, the log files or packet captures have to be handled with due care to

ensure that they are not corrupted or modified during the transfer. One simple solution is to

transfer the evidence immediately to a USB drive or similar removable medium. From
there, a hash can be created for the evidence prior to any examination

Wireshark can be used for capturing packets.
packet captures

The log entry captures the necessary information:

File Name: Each log file or packet capture should have its own unique name.
Within the procedures in use by the IR should be a naming convention for
different types of evidence files.
Description: A brief description of the file. There does not need to be too much
detail unless it is a unique file and a detailed description is called for.
Location: The location is important. In this case, the packet capture was obtained
on the switch located at 192.168.245.141
Date and time: Record the date and time the file was transferred to the medium.
Note: Prior to an incident, it is important to identify what type of time
zone will be in use. From an evidentiary standpoint, the time zone does
not really matter as long as it is consistent among the entire incident
investigation.
Collected by: Initials are sufficient for the log file.
MD5 hash:


packet captures "CF-Image01.pcap"

Source


Machine name : ForensicEx01
Hardware: Intel(R) Core(TM) i7-4702MQ CPU @ 2.20GHz (with SSE4.2)
OS: 32-bit Windows 7 Service Pack 1, build 7601
Application: Dumpcap (Wireshark) 2.6.1 (v2.6.1-0-g860a78b3)
IP: 192.168.245.141
Mac address: 00-0C-29-58-F1-EA

Time
First packet: 2012-10-27 03:19:42
Last packet: 2012-10-27 03:24:02
Elapsed: 00:04:20


Import CF-Image01.pcap


NetworkMiner 

extract image file


Summary
Packet captures provide details into the
exact nature of network traffic. Finally, analysts have to be prepared to acquire these
sources of evidence is a forensically sound manner. The next chapter will take the analyst
off the network into acquiring the volatile data from host based systems.


How to Install Network Miner Packet Analysis Tool


Ref:

Digital Forensic and Incident Reponse Gerard Johansen

https://www.netresec.com/

หมายเหตุ:เนื้อหาในเว็บไซต์นี้มีขึ้นเพื่อวัตถุประสงค์ในการให้ข้อมูลและเพื่อการศึกษาเท่านั้น

* หากมีข้อมูลข้อผิดพลาดประการใด ขออภัยมา ณ ที่นี้ด้วย  รบกวนแจ้ง Admin เพื่อแก้ไขต่อไป
ขอบคุณครับ
#WindowsForensic #ComputerForensics #dfir #forensics #digitalforensics #computerforensic #investigation #cybercrime #fraud

Digital Forensics:WhatsMyName (OSINT)

Digital Forensics:WhatsMyName (OSINT) Welcome to WhatsMyName This tool allows you to enumerate usernames across many websites How to use: 1....