Digital Forensics:Auto Triage OSForensics
การคัดกรองข้อมูลในหลักฐาน (Triage/Preview)
การคัดกรองข้อมูลในหลักฐาน เป็นกระบวนการ เพื่อเปิดดู คัดแยก และจัดลำดับความสำคัญ
ข้อมูลที่เกี่ยวข้องสำหรับเก็บรวบรวมและตรวจวิเคราะห์ในภายหลัง โดยให้เกิดการเปลี่ยนแปลง
ของข้อมูลน้อยที่สุด และการเปลี่ยนแปลงนั้นต้องไม่เกี่ยวข้องกับสาระสำคัญของพยานหลักฐาน
ดิจิทัล โดยการปฏิบัติกระบวนการนี้ขึ้นอยู่กับความเหมาะสม หรือความจำเป็น แล้วแต่กรณีเช่น
เงื่อนไขความเร่งด่วนในการทราบผล
เครื่องมือที่ใช้ในกระบวนการคัดกรอง (Triage/Preview tools)
เป็นเครื่องมือที่ใช้ในการคัดกรองข้อมูลที่คาดว่าเกี่ยวข้องกับคดีจากหลักฐาน เพื่อให้ได้ข้อมูลเบื้องต้นมา
อย่างรวดเร็ว ไม่ต้องรอให้สำเนาข้อมูลเสร็จก่อน โดยเครื่องมือจะสามารถแสดงผลข้อมูลแบบแบ่งเป็น
ประเภทต่าง ๆ ได้ทำให้สามารถวิเคราะห์ข้อมูลที่พบได้เร็วขึ้น โดยไม่ทำให้ข้อมูลในหลักฐานเปลี่ยนแปลง
ในกรณีที่ต้องจัดให้มีการคัดกรองข้อมูลในหลักฐาน มีข้อพึงระวัง ดังนี้
(1) ผู้ดำเนินการต้องอธิบายสิ่งที่ได้ดำเนินการ ผลการดำเนินการ และการเปลี่ยนแปลงที่เกิด
ขึ้นกับข้อมูลภายในหลักฐานได้
(2) กระบวนการนี้เป็นเพียงขั้นตอนการตรวจสอบเบื้องต้น ซึ่งไม่สามารถทดแทนการตรวจพิสูจน์
ที่ครบถ้วนได้ จึงมีความเป็นไปได้ที่จะไม่พบข้อมูลสำคัญที่ต้องการ
(3) ก่อนดำเนินการควรตรวจสอบให้แน่ใจว่าซอฟต์แวร์คัดกรองข้อมูลในหลักฐานที่เตรียมมา
สามารถใช้กับหลักฐานนั้น ๆ ได้
(4) ผู้ดำเนินการต้องพยายามไม่ทำให้วันเวลาของข้อมูลที่บันทึกในหลักฐานเปลี่ยนแปลงไป
เช่น โปรแกรม OSForensics มี Feature Auto Triage
Step 1. Launching Auto Triage
Open the OSForensics application and click on the "Auto Triage" icon located on the Start screen. You can also click the "Auto Triage" module from the Workflow as shown below.
Step 2. Review Default Settings
The Auto Triage window will appear. Review the settings and make any necessary changes to the default settings prior to initiating the scan.
Step 2.1 Review Config Options
Clicking on the “Config” link will open a new dialog window allowing the user to select specific files, folders and directories to be exported into a Logical Image file…
Step 3. Start Scan
After confirming that the case folder location, drive, and scanning options are correct, simply click the "Start Scan" button to start the Auto Triage scan.
Step 4. Review Results
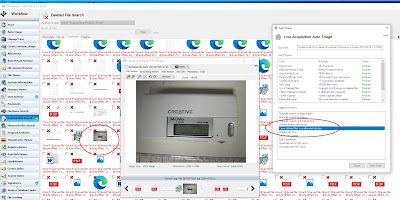
You will see the status of each scan in real-time under the "Status" column. The process is complete when all scans show "Finished". To review results, simply click on the hyperlinks to review the data in the main OSForensics' interface.
Reviewing Results
Refer: auto-triage
ข้อเสนอแนะมาตรฐานการจัดการอุปกรณ์ดิจิทัลในงานตรวจพิสูจน์พยานหลักฐาน Version 1.0
หมายเหตุ:เนื้อหาในเว็บไซต์นี้มีขึ้นเพื่อวัตถุประสงค์ในการให้ข้อมูลและเพื่อการศึกษาเท่านั้น
* หากมีข้อมูลข้อผิดพลาดประการใด ขออภัยมา ณ ที่นี้ด้วย รบกวนแจ้ง Admin เพื่อแก้ไขต่อไป
ขอบคุณครับ
#WindowsForensic #ComputerForensics #dfir #forensics #digitalforensics #computerforensic #investigation #cybercrime #fraud


No comments:
Post a Comment