Friday, February 26, 2021

BitLocker for Digital Forensics – Part II

BitLocker for Digital Forensics – Part II

     วันนี้พบบทความน่าสนใจเรื่องการจัดการหลักฐานที่มีการเข้ารหัสด้วย  BitLocker   โดยในกรณีศึกษา เช่น เมื่อเราไปเก็บหลักฐานจากแล็ปท็อปและทำสำเนาหลักฐานดิจิทัล ( forensic Image ) แล้วพบว่า ในหลักฐานมีการเข้าBitLockerไว้ ไม่มี recovery Key  ก็มีคำแนะนำว่าให้ทำการ ทำสำเนาเก็บไว้ก่อนแล้ว ค่อยไปขอ key และ รหัสผ่านจากผู้ต้องสงสัยทีหลัง  หรือทำการกู้คืน forensic Image ลงบน  Harddisk SSD ใหม่แทน และสลับเปลี่ยน SSD ของแล็ปท็อปด้วยไดรฟ์โคลน แล้วนำรหัสผ่าน Windows และรหัสBitLocker  ที่ได้จากผู้ต้องสงสัย Login แล็ปท็อป จากนั้นทำการ Export recovery Key ออกมา แล้วนำ Key  ที่ได้ไปใส่ในเครื่อง  Forensic workstation ที่กำลังวิเคราะห์หลักฐานและถอดรหัสได้อย่างสมบูรณ์


 ณ จุดนี้เนื่องจากคุณมีสำเนาหลักฐานดิจิทัล forensic Image  file อยู่แล้วคุณจึงไม่ต้องยุ่งกับหลักฐานต้นฉบับบน SSD ของแล็ปท็อปเว้นแต่ว่าจำเป็นจริงๆ คุณสามารถรับ BitLocker PIN และรหัสผ่าน Windows จากผู้ต้องสงสัยของคุณได้ ขั้นตอนการทำงานของคุณดังต่อไปนี้:

1. การกู้คืนอิมเมจทางนิติวิทยาศาสตร์ใส่ในฮาร์ดดิสก์ SSD ใหม่ ("ไดรฟ์โคลน")

2. การเปลี่ยน SSD ของแล็ปท็อปด้วยไดรฟ์โคลน


3. การบูตแล็ปท็อปป้อน PIN และรหัสผ่าน Windows

4. การแยกคีย์การกู้คืน BitLocker

5. การลบ BitLocker ออกจากภาพทางนิติวิทยาศาสตร์บนเวิร์กสเตชันทางนิติวิทยาศาสตร์

6. เริ่มต้นการวิเคราะห์ของคุณจากภาพทางนิติวิทยาศาสตร์ที่ถอดรหัสอย่างสมบูรณ์

(1) นอกจากนี้ยังมีความเป็นไปได้ซึ่งรวมถึงคีย์การกู้คืน BitLocker ที่ผู้ใช้จัดเก็บไว้ในอุปกรณ์จัดเก็บข้อมูลแบบถอดได้หรือสำเนาหลักฐานดิจิทัล ( forensic Image ) หรือจัดเก็บไว้ในบัญชีออนไลน์ของ Microsoft

เปรียบเทียบค่า hash ของ Disk Image  ที่เข้ารหัสโดย BitLocker

Credit:bitlocker-for-dfir-part-iii

           How to Enable BitLocker

หมายเหตุ:เนื้อหาในเว็บไซต์นี้มีขึ้นเพื่อวัตถุประสงค์ในการให้ข้อมูลและเพื่อการศึกษาเท่านั้น

* หากมีข้อมูลข้อผิดพลาดประการใด ขออภัยมา ณ ที่นี้ด้วย  รบกวนแจ้ง Admin เพื่อแก้ไขต่อไป
ขอบคุณครับ

#WindowsForensic #computerforensic #ComputerForensics #dfir #forensics #digitalforensics #investigation #cybercrime #fraud


Friday, February 19, 2021

Digital Forensics:แนวทางการตรวจสอบ E-Mail Header

Digital Forensics:แนวทางการตรวจสอบ E-Mail Header

ข้อมูล Email Header ที่เป็นประโยชน์

  • From:เก็บชื่อบัญชี Email ของผู้ส่ง
  • To: เก็บชื่อบัญชี Email ของผู้รับ
  • Subject:- เก็บหัวเรื่องของ Email
  • Date: เก็บวันเวลาที่อีเมลถูกส่ง
  • Message-ID: เก็บค่า ID ของ email  
  • Content: - เก็บค่ารูปแบบ email  
  • X-Mailer: เก็บค่าของซอฟต์แวร์ที่ใช้ในการส่ง Email
  • Received: เก็บค่าการส่ง email  ว่าถูกส่งผ่านที่ใดบ้าง
  • X-Originating-IP : IP address ของเครื่องที่ส่ง Email
  • Return-path: คือ บัญชีอีเมล์ต้นทาง (ผู้ส่ง)


ทั้งนี้จากรูปแบบการทำงานของ Email นั้นจะมีการบันทึกข้อมูลของช่องทางต่างๆ ที่ Email เดินทางมาถึงผู้รับ ตั้งแต่หมายเลขไอพีของผู้ส่งหรือหมายเลขไอพีของเครื่องเครื่องเซิร์ฟเวอร์ต้นทางที่ถูกใช้ส่งอีเมล  ข้อมูลต่างๆเหล่านี้จะปรากฎอยู่ในส่วนที่เรียกว่า  Email Header การใช้งานในกรณีปกติเมื่อผู้ใช้งานเปิดอ่านอีเมล จะไม่เห็นข้อมูลส่วนนี้แสดงออกมา  แต่พนักงานสอบสวนเปิดดูข้อมูลใน Email Header ได้   สามารถตรวจสอบเส้นทางสื่อสารของ Email หรือรู้ Email ที่แท้จริงของผู้ส่งEmailได้

เครื่องมือที่ช่วยในการวิเคราะห์ Email Header

1. Google Admin Toolbox Message header


2. iptrackeronline

3.  mxtoolbox

4. gaijin

แนวทางการตรวจสอบ E-Mail Header


Credit:ETDA Channel


หมายเหตุ:เนื้อหาในเว็บไซต์นี้มีขึ้นเพื่อวัตถุประสงค์ในการให้ข้อมูลและเพื่อการศึกษาเท่านั้น


* หากมีข้อมูลข้อผิดพลาดประการใด ขออภัยมา ณ ที่นี้ด้วย  รบกวนแจ้ง ADMIN เพื่อแก้ไขต่อไป

ขอบคุณครับ

#WINDOWSFORENSIC #COMPUTERFORENSICS #DFIR #FORENSICS #DIGITALFORENSICS #COMPUTERFORENSIC #INVESTIGATION #CYBERCRIME #FRAUD


Friday, February 12, 2021

DIGITAL FORENSICS: การปฎิบัติงานในสถานที่เกิดเหตุ

DIGITAL FORENSICS:การปฎิบัติงานในสถานที่เกิดเหตุ

ตัวอย่าง: กรณีตรวจพบอาวุธในบริเวณสถานที่เกิดเหตุ เช่น อาวุธปืน มีด ไม่ควรจับต้องโดยตรง ควรใช้วัสดุที่เหมาะสม (เช่น ใช้เชือกคล้องเข้าไปในโกร่งไกปืนในการเคลื่อนย้าย เป็นต้น) หรือจับต้องบริเวณที่ไม่ส่งผลต่อการตรวจพิสูจน์

  อ้างอิงจาก  คู่มือปฏิบัติงานของทีมตรวจสถานที่เกิดเหตุ:สำนักงานพิสูจน์หลักฐานตำรวจ

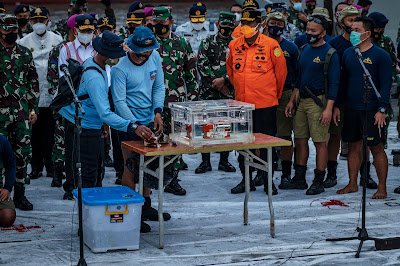
ตัวอย่าง: การกู้คืนกล่องดำ  วันที่ 12 ม.ค. ซีเอ็นเอ็น รายงานว่า ทีมค้นหาอินโดนีเซียกู้ กล่องดำ กล่องแรกจาก 2 กล่อง ของเครื่องบินสายการบิน ศรีวิจายา ที่ตกในทะเลชวา คร่าชีวิตผู้โดยสารและลูกเรือทั้งหมด 62 ราย กล่องดำเป็นเครื่องมือสำคัญสำหรับพนักงานสอบสวนสาเหตุที่เครื่องบินตก

black boxes recovered

Video: CNA.ASIA

Photo: https://www.khaosod.co.th/around-the-world-news/news_5722885

Indonesia: Data recovered from crashed jet's black box

Black Box' From Indonesia Plane Crash Is Recovered

Exhibit needs to be kept in original condition.

อ้างอิง :คู่มือบริหารจัดการสถานที่เกิดเหตุ :สำนักงานพิสูจน์หลักฐานตำรวจ

อินโดฯกู้ได้แล้ว กล่องดำอันแรก บันทึกข้อมูลการบิน ศรีวิจายา แอร์ ดิ่งทะเล62ศพ


อ่านเพิ่มเติม

หมายเหตุ:เนื้อหาในเว็บไซต์นี้มีขึ้นเพื่อวัตถุประสงค์ในการให้ข้อมูลและเพื่อการศึกษาเท่านั้น

* หากมีข้อมูลข้อผิดพลาดประการใด ขออภัยมา ณ ที่นี้ด้วย  รบกวนแจ้ง Admin เพื่อแก้ไขต่อไป
ขอบคุณครับ

#WINDOWSFORENSIC #COMPUTERFORENSICS #DFIR #FORENSICS #DIGITALFORENSICS #COMPUTERFORENSIC #INVESTIGATION #CYBERCRIME #FRAUD


DIGITAL FORENSICS:NTFS Journal Viewer

 DIGITAL FORENSICS:NTFS Journal Viewer

NTFS Journal Viewer (JV) is a portable tool that extracts and parses the NTFS change journal ($UsnJrnl) file. The change journal is a file that records when changes are made to files and directories and therefore can provide a wealth of information for the forensic investigator.

The extraction tool (ExtractUsnJrnl.exe) used in NTFS Journal Viewer was created by Joakim Schicht (https://github.com/jschicht). JV is able to parse hundreds of thousands of records within seconds and provides filtering and search functionality. The results can be exported to CSV file.

$UsnJrnl
The NTFS change journal ($UsnJrnl) is an operating system file that records when changes are made to files and directories. The change journal is located at $Extend\$UsnJrnl. The journal contains two alternate data streams as detailed below:

  • $UsnJrnl:$J – Contains the actual journal entries
  • $UsnJrnl:$MAX – contains metadata about the $UsnJrnl


The contents of the $UsnJrnl file can help forensic investigators identify what activity has occurred to files of relevance to the investigation.

The $UsnJrnl:$J contains useful information as detailed below:

  • File/directory name
  • File/directory attributes
  • USN Reason
  • Time of activity
  • USN reference number
  • MFT reference number
  • MFT parent reference number
  • Security ID
  • Source info

1)      Open JournalViewer.exe

2)      Click the “$J” button and then click the “OK” button. 

Click c: and Ok

   “$UsnJrnl_$J.bin” should be created in the NTFS Journal Viewer Folder. 

 3) click the “Open File” button and select the “$UsnJrnl_$J.bin” file 
Review the results  to  user activity on   computer. 
Search key word.

Search *.exe
check Date & Time 


Credit:


หมายเหตุ:เนื้อหาในเว็บไซต์นี้มีขึ้นเพื่อวัตถุประสงค์ในการให้ข้อมูลและเพื่อการศึกษาเท่านั้น

* หากมีข้อมูลข้อผิดพลาดประการใด ขออภัยมา ณ ที่นี้ด้วย  รบกวนแจ้ง Admin เพื่อแก้ไขต่อไป
ขอบคุณครับ

#WINDOWSFORENSIC #COMPUTERFORENSICS #DFIR #FORENSICS #DIGITALFORENSICS #COMPUTERFORENSIC #INVESTIGATION #CYBERCRIME #FRAUD #MOBILEFORENSICS #$USNJRNL

Saturday, February 6, 2021

Digital Forensics Service Request Form

Digital Forensics Service Request Form

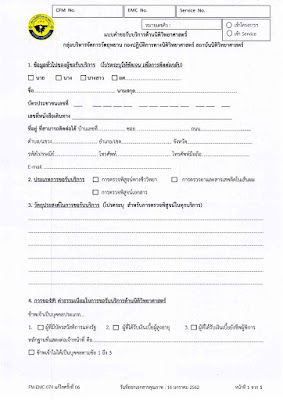
วันนี้นำตัวอย่างแบบฟอร์มการให้บริการตรวจพิสูจน์หลักฐานดิจิทัล  หลายครั้งที่พบปัญหาในการทำงานซ้ำซ้อนเช่น  เคสนี้มี  Keyword อะไร , มี computer หรือ notebook ,Smartphone กี่เครื่อง ,รุ่นอะไร ,OS อะไร  Harddisk ความจุดเท่าไหร, จะเริ่มงานเมื่อไหร่  ,ให้ทำอะไรบ้าง ให้หาอะไร เยอะแยะมากมาย ทำมัยไม่ทำแบบฟอร์มให้มันครอบคลุม หรือยื่ดหยุ่น  เลยนำตัวอย่างมาให้ดูครับ

RCFL(Regional Computer Forensic Laboratory)
njrcfl_service_request-051910.pdf


DC3's Cyber Forensics Laboratory (CFL) performs Digital and Multimedia (D/MM) forensic examinations, device repair, data extraction, and expert testimony for DoD. 

เอกสารขอความยินยอม

CONSENT TO SEARCH MOBILE DEVICE/ COMPUTER

EQUIPMENT / ELECTRONIC DATA

Customers are advised to follow these simple guidelines:

    • Central Processing Unit (CPUs) - Submit the actual CPU not peripheral items such as monitors, keyboards, mice, etc. Do NOT remove hard drives from computers. For MAC computers, include the power cord if one is available.
    • Laptops - Submit the laptop along with the power cord.
    • External Hard drives - Submit external hard drives with the power cord if one is available. Do not remove external hard drives from their cases.
    • CDs and DVDs - Preview all CDs and DVD's in a ROM (read-only drive) prior to submission. Then submit only those items containing suspect files. DO NOT submit unreviewed discs, without prior approval from the CGRCFL staff. Again, commercially produced music CDs and movie DVDs are more than likely not going to have an impact on the investigation. Investigators should sort through the evidence being gathered to ensure these items are not part of the submission to the CGRCFL.
    • Floppy Disks - Floppy disks may be previewed by ensuring the write protection tab is in the open position to prevent altering the contents. Please submit only those floppy discs you have determined are relevant to your investigation.
    • Cell phones/ GPSs/ PDAs - Include data cables, chargers, and docking stations.

FAQs

 In brief, what do I need to do to submit evidence for review


สถาบันนิติวิทยาศาสตร์
 
 
Credit:

 หมายเหตุ:เนื้อหาในเว็บไซต์นี้มีขึ้นเพื่อวัตถุประสงค์ในการให้ข้อมูลและเพื่อการศึกษาเท่านั้น


* หากมีข้อมูลข้อผิดพลาดประการใด ขออภัยมา ณ ที่นี้ด้วย  รบกวนแจ้ง Admin เพื่อแก้ไขต่อไป
ขอบคุณครับ

#WindowsForensic #computerforensic #ComputerForensics #dfir #forensics
#digitalforensics #investigation #cybercrime #fraud

Thursday, February 4, 2021

HOW TO RECOVER WINDOWS PASSWORDS FROM MEMORY

HOW TO RECOVER WINDOWS PASSWORDS FROM MEMORY

MEMORY FORENSICS ACQUISITION

Step 1: Get the memory dump


Go to File > Capture Memory.
Select a destination path such as your Desktop and click Capture Memory.


Step 2: Choose a memory forensics tool

Passware Kit Forensic  is the complete encrypted electronic evidence discovery solution that reports and decrypts all password-protected items on a computer.

Step 3  Memory Analysis  Click Browse… and locate the memdump.mem file from PasswordsFromMemoryImage folder. Click Open.


Step 4  Windows User > Recovery passwords for Windows user form a memory image
The software scans   a memory image  for Windows User passwords, as shown below:
Step 5. Passware Kit extracts passwords for Windows users, as well as the list of open websites along with their login credentials:

Step 6. extracts passwords for websites from a memory image.
And displays a list of  passwords:


Credit:Passware Kit Forensic

สรุป 

  การเก็บ memory นั้นต้องมีการเชื่อมต่ออุปกรณ์ภายนอกเข้าไป ก็สุ่มเสี่ยงต่อการปนเปื้อนพยานหลักฐาน และอาจจะเกิดคำถามในชั้นศาลได้   อาจทำให้น้ำหนักของพยานหลักฐานขาดความน่าเชื่อถือได้ หากผู้ตรวจสอบไม่ได้ทำตามขั้นตอนการเก็บที่ถูกวิธี  และไม่ได้จดบันทึกรายละเอียดการเก็บหลักฐานไว้  อาจทำให้ไม่เป็นที่ยอมรับฟังในชั้นศาล  จึงเป็นประเด็นหนึ่งที่ต้องพิจารณาในการเก็บหลักฐานชนิดนี้


หมายเหตุ:เนื้อหาในเว็บไซต์นี้มีขึ้นเพื่อวัตถุประสงค์ในการให้ข้อมูลและเพื่อการศึกษาเท่านั้น ช่วยเตือนความจำ

* หากมีข้อมูลข้อผิดพลาดประการใด ขออภัยมา ณ ที่นี้ด้วย  รบกวนแจ้ง Admin เพื่อแก้ไขต่อไป
ขอบคุณครับ

#WINDOWSFORENSIC #COMPUTERFORENSICS #DFIR #FORENSICS #DIGITALFORENSICS #COMPUTERFORENSIC #INVESTIGATION #CYBERCRIME #FRAUD